By Liz Bolton, RYT-200, RPYT-85
Chances are, your post-baby body feels and moves differently than your pre-baby body. And it should—you created another human!
When it comes to how you can best heal, recover, and build strength after delivering a baby, one of your best resources is a women’s health physical therapist (your obstetrician can refer you if you ask). While none of this information is a replacement for the guidance of your doctor and physical therapist, these poses can help get you started on the path to recovery.
The exercises below help to redevelop the brain-body connection and strengthen your core muscles, a necessary foundation to movement. Practice with these movements, in order or one at a time, whenever you can fit them in (maybe tummy time becomes family exercise time). They are gentle enough that they don’t require an extensive warm up, but they are so effective—and they are appropriate for moms six weeks post-baby all the way up to sixteen years or more. Postpartum is forever!
Diaphragmatic Breathing

This exercise can be started as soon as you feel ready to do so. It’s extremely gentle and can be done anywhere—with a baby sitting on your lap or while you’re awake in bed..
To start, sit up tall with both feet flat on the ground or in a comfortable seat on the floor. You can also lay on the floor (bend your knees if your low back is bothering you). Close your eyes for an extra calming effect.
Start to inhale, slowly and with control, thinking about breathing low and wide. Breathe so your low belly and your low back expand, imagining that you’re opening up a full 360 degrees.
On the exhale, give your belly a gentle hug back in. Keep repeating, inhaling as your belly and ribs open and expand to the front, back, and sides, and then exhaling as you actively but gently hug everything back in.
Try for 5 to 10 breaths in a row.
Dead Bugs

Lay on your back, knees bent, feet flat on the ground, low back pressed into the floor. Keep your hands long by your side, palms face down.
Lift one knee up so your shin is parallel to the ground; your knee can be right above your hips or pulled a little closer to your chest, as long as your back stays on the ground. Lift the other knee up to meet the first.
Keeping the low back pressed down and your shins parallel to the ground, open the knees a little wider than your hips and bring your feet a little closer together, so your lower legs are in a V.
Start to lower the heel of one foot to the ground, very slowly, keeping your low back pressed to the ground. Only go as far as you can while keeping your low back down. Then return the foot back to the starting position and lower the other heel toward the ground. Remember to breathe deeply into the low back and keep it pressed into the ground.
Over time, you should be able to move the heel closer to the ground and farther away from your bottom. As you build strength, you can add your arms in—lift them directly up from the shoulders, palms facing each other with a little bend in the elbow like you’re hugging a beach ball. Lower the opposite thumb to the floor above your head as you move your heel down to the ground. Focus on keeping the opposite arm and leg perfectly still.
Complete five to 10 on each side.
Bridges

Lay on your back with your knees bent, feet as wide as your hips and flat on the ground, arms long by your side. Press your low back into the ground and scoot your feet away from your bottom. Your feet should be far enough away that you aren’t able to touch your heels with your fingertips.
As you exhale, lift your hips up off the ground, but keep your shoulder blades pressing down into the ground. Think about squeezing your bottom as well as driving your shoulder blades down against the ground.
Don’t arch your back or let your ribs flare open; imagine that you are knitting the ribs on each side of your chest together in the middle. You should be in a long line from your shoulders to your hips. This position itself may feel challenging. Take the time to get it right; make sure you’re breathing.
You can hold here or start to add in some movement. Slowly lower your hips down toward the ground, tap them, and lift them back up, keeping your torso as one solid line, hips pressing up, chest pressing down, ribs hugging in.
Complete 10, but take breaks if you need to.
Spinal Balance

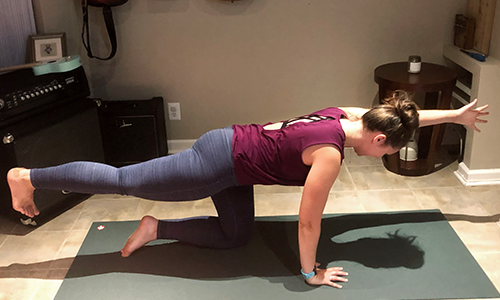
Set up on all fours, knees underneath hips, hands underneath shoulders.
As you inhale, extend your right leg back behind you, knee straight, and imagine that you are going to drive your heel through the wall behind you. At the same time, reach your left hand out in front of you, palm facing you as if you were going to shake someone’s hand.
Exhale, lower both your hand and your leg and switch sides. Inhale and extend the left leg and right arm. Exhale to lower and inhale to switch sides.
Focus on keeping your hips steady and stable. They should be level. The goal is to keep them still, even as you switch legs. You can balance a yoga block on your low back to remind you to keep your hips stable. Move slowly; this should feel hard.
If your low back bothers you, don’t lift the leg so high and focus on breathing down into your belly to recruit your deep abdominal muscles.
Fire Hydrants

From all fours, keep the right knee bent as you inhale and lift it out to the side. Lower the leg back down and then lift it again. Move slowly, focusing on keeping the hips steady and facing down toward the ground. The hip isn’t opening to the side; just your leg is.
Complete 10 on one side, resting if you need to and then switch to the other side.
If you have more time, you can cycle through these five movements up to three times, and remember to end with a brief rest, even if it’s just one deep breath. Congratulations, mama, on taking care of yourself. You’re doing a great job!
Lansinoh strongly recommends that you consult with your physician before beginning any exercise program. All content found on the Lansinoh.com website, including text, images, audio, or other formats were created for informational purposes only. The content is not intended to be a substitute for professional medical advice, diagnosis, or treatment. Always seek the advice of your physician or other qualified health provider with any questions you may have regarding a medical condition. Never disregard professional medical advice or delay in seeking it because of something you have read on this website.


